It's a Jungle Out There...: Difference between revisions
Improvements and added links |
No edit summary |
||
| Line 12: | Line 12: | ||
}} | }} | ||
'''It's a Jungle Out There''' is the first level of the [[Jibberish Jungle]], the first world in ''[[Rayman Origins]]''. In this level, | '''It's a Jungle Out There''' is the first level of the [[Jibberish Jungle]], the first world in ''[[Rayman Origins]]''. In this level, the heroes meet [[Betilla]] the Fairy, saving her from a [[Antitoon|Darktoon]]. As a tutorial level, this level doesn't feature any secret area with [[Electoon]] [[cage]]s or [[speed trophy|time trial]], and the level didn't feature in the [[Back to Origins]] painting in ''[[Rayman Legends]]''. The level's name is presumably a reference to the song of the same name by Randy Newman. | ||
==Area 1== | ==Area 1== | ||
As soon as the | As soon as the heroess enter this level, they encounter [[Betilla]] the Fairy, who has been trapped inside the mouth of a [[Antitoon|Darktoon]]. The heroes must chase this [[Antitoon|Darktoon]] until it reaches a dead end inside of a gigantic mountain-like monster. To make the monster open his mouth and get inside, the heroes must jump on the two [[explosive bulb]]s situated on its head, giving them a chance to destroy it and free [[Betilla]]. In appreciation, she gives them the power to attack, similar to how she gave [[Rayman]] the [[telescopic fist]] in [[Rayman 1|the original ''Rayman'' game]]. | ||
A colourful and ornate castle with many domes, built over a river which runs through a valley surrounded by jungle can be seen in the background. The [[Skull Coin]] in this area is located on the top of the first mountain. The end of the area displays the return of the [[Livingstone|Livingstones]], now | A colourful and ornate castle with many domes, built over a river which runs through a valley surrounded by jungle can be seen in the background. The [[Skull Coin]] in this area is located on the top of the first mountain. The end of the area displays the return of the [[Livingstone|Livingstones]], now renamed in ''[[Rayman Origins]]'' as Lividstones. This is first enemy that the heroes face with their new attack power. | ||
<gallery widths="320px" heights="180px"> | <gallery widths="320px" heights="180px"> | ||
ChasingBetilla.jpeg|The | ChasingBetilla.jpeg|The heroes will be chasing the [[Antitoon|Darktoon]] that's holding [[Betilla]] captive. | ||
RO_SentientCliffBetilla.jpg|The [[Antitoon|Darktoon]] holding [[Betilla]] takes refuge between this mountain-like monster. | RO_SentientCliffBetilla.jpg|The [[Antitoon|Darktoon]] holding [[Betilla]] takes refuge between this mountain-like monster. | ||
</gallery> | </gallery> | ||
==Area 2== | ==Area 2== | ||
The heroes move on into deep forestry, where they are able to come to grips with their new attacking abilities. In order to successfully traverse some of the obstacles, the heroes will need to hit various [[bulb]]s. Green [[bulb]]s can retract and release [[nenuphar]]s that the heroes can jump upon to progress. Blue [[bulb]]s retract and release [[spiky flower]]s that can damage the heroes, however, they can also use them to their advantage by using them against unsuspecting [[Livingstone|Lividstones]]. | The heroes move on into deep forestry, where they are able to come to grips with their new attacking abilities. In order to successfully traverse some of the obstacles, the heroes will need to hit various [[bulb]]s. Green [[bulb]]s can retract and release [[nenuphar]]s that the heroes can jump upon to progress. Blue [[bulb]]s retract and release [[spiky flower]]s that can damage the heroes, however, they can also use them to their advantage by using them against unsuspecting [[Livingstone|Lividstones]], though unlike attacking them, this won't yield the heroes any [[Lum (UbiArt games)|Lums]]. The heroes must be aware of which [[bulb]] they activate or deactivate, in order to avoid being bubblized by the [[spiky flower]]s or the [[Livingstone|Lividstones]] in the area. The second [[Skull Coin]] in this area is located between a wall and [[spiky flower]]s; to reach it, the heroes must jump from a [[nenuphar]], while carefully avoiding the flowers. | ||
<gallery widths="320px" heights="180px"> | <gallery widths="320px" heights="180px"> | ||
| Line 34: | Line 34: | ||
==Area 3== | ==Area 3== | ||
In the final phase, the | In the final phase, the heroes must defeat all of the enemies in the area in order to break the [[cage]] at the end of the level. Two [[Psychlops]] can be seen sleeping together, a [[Livingstone|Lividstone]] is seen in the middle of the lower platform, another [[Psychlops]] is situated close to a geyser, and a [[hunter]] can be seen guarding the [[cage]] on the top of a platform, shooting his [[bullet]]s at a green bulb in order to make a [[nenuphar]] release and retract constantly. Once all of the enemies have been defeated, the magic force shield will disappear and the [[Electoon]] cage can be broken. When done, the [[The Photographer|photoboard]] appears, and the heroes pose for a picture. As the heroes pose, [[the Magician]] waits in anticipation to see the total amount of [[Lum (UbiArt games)|Lums]] that were collected throughout the level. | ||
<gallery widths="320px" heights="180px"> | <gallery widths="320px" heights="180px"> | ||
Revision as of 22:11, 22 August 2019
| It's a Jungle Out There... | |||||||||||
|---|---|---|---|---|---|---|---|---|---|---|---|
 | |||||||||||
| Geyser Blowout → | |||||||||||
 Jibberish Jungle Jibberish Jungle
| |||||||||||
   
|
   
|

| |||||||||

|
|||||||||||

It's a Jungle Out There is the first level of the Jibberish Jungle, the first world in Rayman Origins. In this level, the heroes meet Betilla the Fairy, saving her from a Darktoon. As a tutorial level, this level doesn't feature any secret area with Electoon cages or time trial, and the level didn't feature in the Back to Origins painting in Rayman Legends. The level's name is presumably a reference to the song of the same name by Randy Newman.
Area 1
As soon as the heroess enter this level, they encounter Betilla the Fairy, who has been trapped inside the mouth of a Darktoon. The heroes must chase this Darktoon until it reaches a dead end inside of a gigantic mountain-like monster. To make the monster open his mouth and get inside, the heroes must jump on the two explosive bulbs situated on its head, giving them a chance to destroy it and free Betilla. In appreciation, she gives them the power to attack, similar to how she gave Rayman the telescopic fist in the original Rayman game.
A colourful and ornate castle with many domes, built over a river which runs through a valley surrounded by jungle can be seen in the background. The Skull Coin in this area is located on the top of the first mountain. The end of the area displays the return of the Livingstones, now renamed in Rayman Origins as Lividstones. This is first enemy that the heroes face with their new attack power.


Area 2
The heroes move on into deep forestry, where they are able to come to grips with their new attacking abilities. In order to successfully traverse some of the obstacles, the heroes will need to hit various bulbs. Green bulbs can retract and release nenuphars that the heroes can jump upon to progress. Blue bulbs retract and release spiky flowers that can damage the heroes, however, they can also use them to their advantage by using them against unsuspecting Lividstones, though unlike attacking them, this won't yield the heroes any Lums. The heroes must be aware of which bulb they activate or deactivate, in order to avoid being bubblized by the spiky flowers or the Lividstones in the area. The second Skull Coin in this area is located between a wall and spiky flowers; to reach it, the heroes must jump from a nenuphar, while carefully avoiding the flowers.
-
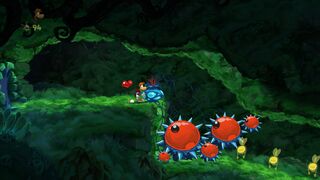 Blue bulbs retract and release spiky flowers, these can bubblize both hero and enemy.
 -

-
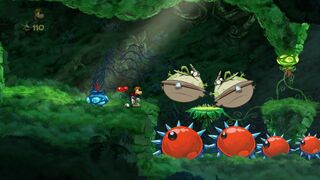


Area 3
In the final phase, the heroes must defeat all of the enemies in the area in order to break the cage at the end of the level. Two Psychlops can be seen sleeping together, a Lividstone is seen in the middle of the lower platform, another Psychlops is situated close to a geyser, and a hunter can be seen guarding the cage on the top of a platform, shooting his bullets at a green bulb in order to make a nenuphar release and retract constantly. Once all of the enemies have been defeated, the magic force shield will disappear and the Electoon cage can be broken. When done, the photoboard appears, and the heroes pose for a picture. As the heroes pose, the Magician waits in anticipation to see the total amount of Lums that were collected throughout the level.
-
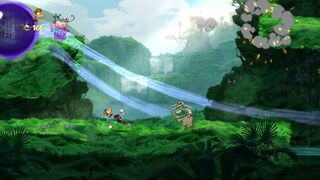 The third and final area of the level.
 -
 Two Psychlops are sleeping near the entrance.
 -


